Showing posts with label document library. Show all posts

Tuesday, June 18, 2013

Using JQuery to hide SharePoint 2013 List Item fields

Hiding unnecessary fields in DispForm.aspx/EditFOrm.aspx is something most of us implement within our SharePoint implementations. Here is a quick way to achieve that using JQuery.
Hiding any List Item fields
So you have many fields in your NewForm.aspx but you want to hide some like in the screenshot. I want to hide the fields I haven’t underlined.


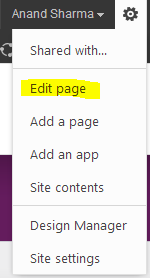
I will click on Edit Page, and add a Script  Editor webpart on the page. From the below script, just change the number in which your fields appear on the page using a 0 index. So to hide the first field, enter 0, second field – enter 1 and so on.


Also you can do some formatting on your page using Jquery, for example I am making the font as BOLD for the list item entries.
$(".ms-formbody").css("font-weight","bold");

Also,
I want to hide the information in the screenshot, you can add this line as well.


$(".ms-descriptiontext").css("display","none");
Hope this helps someone looking for a similar scenario.

Thursday, April 4, 2013

Programatically breaking inheritance and adding unique permission to List Items


Permission handling is something which makes SharePoint a favorite product within the industry. SharePoint has Permission levels in built for basic roles, however you can create your own permission levels and assign to Groups and then set those groups to access any site/library/list. Whenever a sub-site is created, it asks you if you want to inherit the permission from the parent site or want to create unique permissions. 

If you choose to inherit the permissions, it will copy the same set of permissions to the sub-site which will again be passed on to the lists/libraries you create. It may happen that for securing our content, we want to break this inheritance and want to assign unique permissions to restrict the users for certain actions and to make the content more secure. Inheritance can be broken manually using the Out of feature also and if you have a business logic in place, you can do it programmatically also. This blog post gives you code to break inheritance for items meeting certain criteria and assigning permissions to them explicitly. I am using ItemAdded() event receiver to do this. You can use it within workflow or any custom webpart as well.

SPGroup securityGroup = spWeb.SiteGroups["Security Group Name"]; 
SPRoleDefinition groupRole = spWeb.RoleDefinitions["Read"]; 

SPRoleAssignment roleAssign = new SPRoleAssignment(securityGroup); 
roleAssign.RoleDefinitionBindings.Add(groupRole); 

SPListItem listItem = spWeb.GetListItem("http://List Item URL"); 
listItem.BreakRoleInheritance(true); 
listItem.RoleAssegnments.Add(roleAssignment); 
listItem.Update();

Monday, April 1, 2013

Creating Event Recievers within Visual Studio 2010

Event receivers can be broadly seen as of two types:

Asynchronous (triggered before finishing of previous event)
          ItemAdding, ItemUpdating
Synchronous (triggered after finishing the previous event)
          ItemAdded, ItemUpdated

Follow Steps to create an event receiver with Visual Studio 2010 and SharePoint 2010 :
  • Open up Visual Studio 2010 with administrator privileges
  • Click File > New > Project
  • Under Installed templates, click SharePoint and then select Event Receiver (C# in my case). Enter the name, storage location and Solution name in the text box provided and click on OK.
    • It will then ask you to specify the site and trust level or scope of your solution. If you want to deploy it across your farm so that all web applications can make use of it, you should select Deploy as Farm Solution. However, with event receivers, it is not usual so we will select Deploy as Sandboxed solution, which means it will only be accessible to the sites where we activate this feature.
    • Now it will ask you to select the type of Event Receiver you would like to create. In our case it would be List Item Events. Then select what item should be the event source, here we will select Document Library as we want to create an item in document library and want our event receiver logic to run after that. You may want to select Picture library or a list here or as per your business scenario.

    • Now, check the events you would want to code for within your receiver. For the sake of example, I will check An Item was Added which means it will automatically create a method stub for me with ItemAdded method. Now click on Finish.


    Our development IDE is ready to use now and you can see the method stub for ItemAdded being created already.

    Copy and Paste the code below to your solution.
    using (SPWeb web = properties.OpenWeb())
    {
        //Name is a metadata column within my document library
        //Checking if the Name field is equal to Test
        if (properties.ListItem["Name"] == "Test") 
        {//If it is
            // Populating the Title field with some value
            properties.ListItem["Title"] = "Event handler works"; 
            // Updating the ListItem to incorporate the change. 
            // Necessary step, without this  the changes are not pushed to ListItem
            properties.ListItem.Update(); 
        }
    
    }
    
    
    Some more useful methods which can be used are
    //Name of the Document Library
    string DocLibraryName = properties.ListTitle.ToString();
    
    //Getting the Item ID
    int ItemID = properties.ListItem.ID;
    
    //Collection of Role Assignments - required for controlling permission to the Item
    SPRoleAssignmentCollection roleAssignment = properties.ListItem.RoleAssignments;
    

    Build the solution and deploy it. Go to your SharePoint site and activate it(if not already activated) and create any document library and create an item with Name as Test and see your event receiver in action.

    This event receiver will fire on all the document libraries within your site where you have activated the feature, if this is not the intended behaviour, use
    if(properties.ListTitle.ToString() == "DocumentLibraryName")
    
    And write all your logic within your IF block.

    For any queries please feel free to email me. If this post helped you, please share it and benefit more and more fellow SharePoint developers

    Friday, March 8, 2013

    SharePoint2010 : Manually sending items to Record Center


    Once you have followed my previous blogs


    you are ready to proceed and send the items you wish to the Record Center.

    To manually, send the items to Record center, click on the dynamic dropdown for the item. Hover the mouse on Send To and select your record center that you have created. That's it, SharePoint will do the rest as we have made our web application ready by creating Sent to connection and setting the content organizer rules.

    Follow the screenshots for more clarity:


    Thursday, March 7, 2013

    SharePoint2010 : Creating Send To connection


    Follow the steps below once you have Created your Record Center. If you want to see how to Create Record Center, Click here.

    Make a note of the Submission Web Service URL 
    • Navigate to your Record Center
    • Go to Site Settings
    • Click on Content Organizer Settings under Site Administration 


    • Select the Web URL and copy it to clipboard/notepad  (we will use it later)


    Create Send To connection
    • Ensure that you have the required permissions to perform this procedure. To create a connection, you must be a member of the Farm Administrators group.
    • Go to SharePoint Central Administration, under General Application Settings, click Configure Send To Connections.

    •   In the Web Application field of the Configure Send To Connections page, select the Web application that hosts the site collections from which documents will be sent.


    • From the Send To Connections list, select New Connection.
    • In the Display name field, type a name for this connection. This is the name that users will see as one of the options to which to send a document.
    • In the Send to URL field, enter the URL which we copied in the initial steps. Click "Click here to test" if you want to confirm that you have entered a URL to a Content Organizer. This should bring you up the web service that transfers the document from source to destination.
    • To display this connection in the list that appears when a user clicks Send To, select Allow manual submission from the Send To menu.
    From the Send To action list, select one of the following values:
    • Copy: Select this option to create a copy of the document and send the copy to the destination repository.
    • Move: Select this option to delete the document from its current location and move the document to the destination repository. Users will no longer be able to access the document from its original location.
    • Move and Leave a Link: Select this option to delete the document from its current location, move it to the destination repository, and leave a link at the current location indicating that the document has been moved. When a user clicks this link, a page will appear that displays the URL of the document and the document’s metadata.
    • In the Explanation dialog box, type the information to be added to the audit log when the user sends a document by using this connection. If you selected Move and Leave a Link in the previous step, the page that appears when the user clicks the link will also display the explanation.
    • Click Add Connection to create the connection.
    • Click OK.


    Wednesday, March 6, 2013

    Applying Retention Policy to SharePoint 2010

    Records Management is one of the very important aspects of SharePoint 2010 along with document management. Retention can be set either on content types or on folders depending on business case. In this post, I will explain how to set retention on any SharePoint library.
    To start with applying retention to your library items, let us create a content type and then we will apply the retention to the content type which will drive the documents throughout their life cycle.
    Now that we have our content type ready, document is in the library with valid value in the metadata field, we can proceed to apply retention to the content type.

    Step 1: Click on Library Settings > Information management policy settings (under Permissions and Management)
    Step 2: You can see the Vouchers content type listed along with the by default Folder content type. Click on Vouchers content type.

    Step 3: Check the Enable Retention check box and click on Add a retention stage
    Step 4: To trigger off the retention, our custom column (Voucher Date) which we added while creating the content type will be listed here. Select Voucher Date from dropdown and put 2 years (for the sake of this post). This is where you will put in your business case and fill in the value you want.
    Step 5: Once we selected the Voucher Date and entered the number of years, now it’s time to select the kind of action we would want to perform on the item. The Action dropdown will list the available actions to choose from.

    Let us declare the item as record after 2 years (for sake of this post).
    Select Declare Record and click on OK.
    Now you will be directed to the previous page with your event described as below. If you want you can add another stage of retention based on your organisation policy. For example, you would want to delete the item after keeping it for another 5 years after you have declared as a record. So you can add another stage here. Also, you may want to send the record to Record Centre after certain period, you can add that here by adding a new stage.
    And we are done. We have now successfully applied retention to our content type.
    You can follow the similar way to apply retention to any folder; the process is exactly the same, so I am not mentioning it in my post.

    The SharePoint job which works in background to make the retention work is Information management policy job and Expiration policy job. They can be scheduled as per your organization policy going into the Central Administration > Monitoring > Review job definitions (under Timer jobs).


    Create Custom Content Type in SharePoint 2010

    Content Management is an integral part of SharePoint 2010. It helps organize your documents, items and records in a way you have control over its life cycle. We can define what fields we want to use in content types and their data types. Also we can apply validations on the fields within a content type. This blog post describes creation of a custom content type within the site collection and using it within the document library.
    Step 1: Create a content type “Vouchers” with some metadata columns.
    Go to Site Settings > Site Content Types (under Galleries) > Create.

    Step 2: Create two additional columns within the content type.


    Step 3: Create a document library named “Payment Vouchers”.


    Step 4: Enable use of Content types within the library.
    Go to Library Settings > Advanced Settings (Under General Settings) and select Yes for Content Types.

    Step 5: Add our custom content type to this library.
    Click on Add from existing site content types and select our newly created content type “Vouchers” from the list and click Add. Also, I will remove the Document content type available in this library by default to avoid any confusion.

    Once we add the Vouchers content type and remove the Document content type, the New Item ribbon button in our library will look like below:

    Step 6: Now we can upload some documents to this library.
    Click on Upload Documents and browse your file to upload. Once the upload is done, you will be asked to fill in the metadata for our content type Vouchers.

    If you note, we made Voucher Date as mandatory, which is marked as a red asterisk. After filling in proper metadata, click on Save to complete the upload. Content types can be very helpful when you have thousands of documents in the same library and you have many types of documents in it, so creating separate content types for them and saving them under their appropriate values with their respective metadata values can be very helpful within the organization. Also, content types are very useful when you have a similar kind of documents within your site in different libraries, so you can create a content type and re use it in all the libraries. Implementation of Retention schedules also is one key benefit of using own custom content types.

    Tuesday, March 5, 2013

    SharePoint 2010 : Query using SPMetal entity

    In SharePoint 2010, we can use LINQ queries to search data within SharePoint site. In previous SharePoint versions, I tend to use CAML queries instead, which is an efficient way to look for items. However, LINQ queries are faster and simpler to implement.
    For more information on LINQ queries: follow this URL
    For using LINQ within SharePoint, Microsoft has provided a tool named SPMetal.exe which resides in the 14 hive folder. This tool generates an entity class which we can add to our Visual Studio solution to get intellisense and use the entity classes for fetching data from SharePoint site.

    Using SPMetal.exe

    Go to command prompt and navigate to
    • C:\Program Files\Common Files\Microsoft Shared\Web Server Extensions\14\bin
    • Type SPMetal.exe /web:http://sharepointsite /code:C:\MyLINQEntity.cs

    Now if you open the file, we just created, you can see all the lists, libraries have their classes with content types mentioned. It might happen that some custom content types are replaces with Item which is by default behaviour; you can modify the content types for the actual ones (you will get it in the intellisense).

    Now that you add your .cs file to your Visual Studio project, you can use it for fetching items in SharePoint site.

    using (PropertiesEntityDataContext context = new PropertiesEntityDataContext(SPSiteAddress))
    {
    //creating object from the Entity
    EntityList<legalcasedocumentset> documentSet = context.GetList<legalcasedocumentset>(libName);
    var first3Items = from item in documentSet.ScopeToFolder(folderURL, true)
    where item.Name == docSetName
    select item;
    

    Wednesday, February 20, 2013

    SharePoint 2010 : Content types that are available to this Document Set have been added or removed. Update the Document Set.

    Sometimes when we click on a document set and within the same we see a yellow line reading 
    Content types that are available to this Document Set have been added or removed. Update the Document Set.
    The reason behind it is that this document set is not created using the OOB way but using some kind of code practices. Ideal way to create document set is by using 

    - DocumentSet.CreateDocumentSet

    which sets the docset_LastRefresh property. But doing it in any other way doesn't set this property resulting in the above warning message. To get over with this, we should manually write the code to set the property and prevent seeing this warning in every document set created this way.

    SPFolder docSet = web.GetFolder("site/doc lib/folder");
    docSet.Item.Properties["docset_LastRefresh"] = SPUtility.CreateISO8601DateTimeFromSystemDateTime(DateTime.UtcNow);
    docSet.Item.SystemUpdate(false);


    Friday, February 8, 2013

    SharePoint 2010 : Copying Document sets programatically from one library to another with metadata


    Many of you must have come across situations where you have to move the already created Document sets (with a whole bunch of documents in it) from one location to another due to organization re-structure or may be introduction of some new ways of working.
    I did come across similar situation where I had to move 5000 Document Sets with documents in them counting 60,000 in total from one library to another. In my case the document sets are within a folder in the source library. Since I am not a folder-loving developer, I tend not to use them frequently.

    So here is my code to copy the document sets from source library and put it into the destination library without folders.
    Please note:

    • Metadata columns (for Document Set and Document) should read same in the destination library and the source library if you want them to be copied along the process
    • Make sure you have set up Document Set content types in the destination library
    I am using a console application so add reference to  
    • Microsoft.SharePoint
    • Microsoft.Office.DocumentManagement.DocumentSets
    and make sure your target machine and build is set to proper values.
    
    
    using (SPSite site = new SPSite("http://sharepointsite"))
                {
                    using (SPWeb web = site.OpenWeb())
                    {
                        SPFolder folder = web.GetFolder("folderURL"); // sharepointsite/library/folder
    
                        SPList sourceList = web.Lists["sourcelistname"];
    
                        SPQuery query = new SPQuery();                    
                        query.Folder = folder;
    
    
                        SPListItemCollection itemColl = sourceList.GetItems(query);
                        foreach (SPListItem sourceItem in itemColl)
                        {                        
    
                            if (sourceItem.ContentType.Name == "Document Set")
                            {
                                DocumentSet documentSet = DocumentSet.GetDocumentSet(sourceItem.Folder);
    
                                SPList targetList = web.Lists["targetListName"];
    
                                SPContentTypeId contentTypeId = targetList.ContentTypes["destination document library"].Id;
    
                                byte[] documentSetData = documentSet.Export();
    
                                string documentSetName = documentSet.Item.Name;
    
                                SPFolder targetFolder = targetList.RootFolder;
    
                                Hashtable properties = sourceItem.Properties;
    
                                DocumentSet.Import(documentSetData, documentSetName, targetFolder, contentTypeId, properties, web.CurrentUser);
                            }
                        }
                    }
                }


    Saturday, July 21, 2012

    SharePoint 2010 Content Management

    Enterprise Content Management(ECM) combines the traditional content management, social capabilities, and powerful search, it is as natural to manage as it is to use. With its simple, “behind-the-scenes” administration, we can configure the content management to our use.

    I would like to explain some of the aspects of Content Management in this article.

    As we come across managing the content within an organization, we deal with metadata which is the data about data. MOSS 2007 has site columns as metadata which were very useful in organizing and searching data. SP2010 comes up with more such ease of managing your data and meta with concepts with content organiser, in place record management, document id and so on.

    Let take Document ID feature first, so in SP2010 whenever any document is uploaded, it is assigned a unique Document ID which remains with the document throughout its life cycle irrespective of which library/site it is in. This makes documents easily searchable and more manageable. With the document ID,we can search it and locate its current position. Its always good to have one unique field associated with our content and this time SharePoint gives it to you by default.

    SP2010 makes the use of managed metadata which was there in MOSS2007 but in a very efficient way. For that we first need to understand the concept of Term Store. A term store is a collection of Term Sets which is again a collection of Terms. Now terms are the tags which we define in central admin which can be used across our site collection level or web application level. We need to create a set of terms and name them according to our line of business (LOB). The set of these term sets are called term store. Now lets go to our document library settings and try adding a new field as managed metadata, it will bring you with the option to select yours tags, which are same as what we just defined in central admin now as term sets. We can select single or multiple tags as per the requirement. This makes our content easily manageable and fast searchable.

    So we see that managed metadata connects our term sets and the content.

    Another new feature In Place Record Management is another important feature by which we can declare a content as Record and it will behave in a specific way we assign. For that we have to initially configure how we want the records to behave and then declare the content (as required) as Record, using an inbuilt ribbon button. This separates that particular content from others and is very useful when we are dealing with archival of documents.

    Content Organizer (Metadata driven) can create deep, hierarchical folder structures and manage retention at each folder in the hierarchy(or inherit from parent folder) and route incoming documents to the libraries. So we see that it can act as a post office where all the documents arrive and then routed to their specific houses from there. We can configure our emails to arrive here and based on rules (metadata), we can route our content.